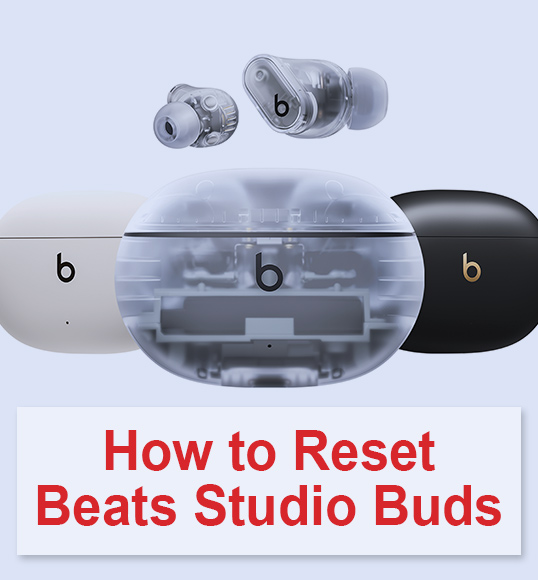
In today’s fast-paced world of wireless earbuds, knowing how to reset your audio gear can be a game-changer when troubleshooting issues or preparing them for a new device. The Beats Studio Buds are no exception.
Whether you’re experiencing connectivity problems, audio glitches, or simply want to pair them with a different device, a reset can often do the trick. In this guide, we’ll walk you through the simple steps to reset your Beats Studio Buds, ensuring they function at their best and continue delivering the outstanding sound quality they’re known for.
Table of Contents
Quick Guide: How to Reset Beats Buds
Resetting your Beats buds can resolve various issues and ensure smooth performance across all Beats models. Here’s a quick and easy step-by-step guide to help you reset your Beats buds:
- Step 1: Put your Beats buds into their charging case and ensure they’re properly seated.

- Step 2: Close the lid of the charging case and wait for at least 10 seconds.
- Step 3: Open the lid of the charging case.
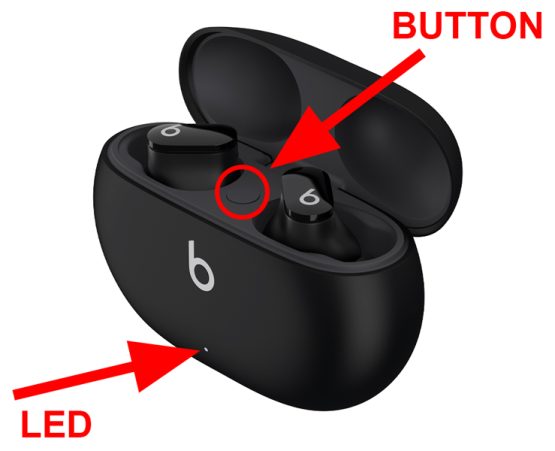
- Step 4: Press and hold the pairing button (or power button) on the case for approximately 15 seconds.
- Step 5: Release the button when you see the LED indicator on the front of the case flash white or amber.
- Step 6: Your Beats buds are now reset and ready to pair with your device.
Resetting your Beats buds can help resolve connectivity issues, audio problems, or prepare them for a new device. It’s a handy troubleshooting step to keep your audio experience top-notch.
How to Reset Your Beats Studio Buds
So now, you’ll learn how to reset your Beats Studio Buds swiftly and effectively to troubleshoot issues or prepare them for a fresh start.
1Place Your Pair of Beats Studio Buds Inside the Charging Case
To start resetting your Beats Studio Buds, put both earbuds in their charging case (you can only reset within the case).
The charging case serves multiple purposes, including charging, storage, and some other certain functions.
2Ensure the Charging Case Lid Stays Unsealed
To initiate a hard reset, it’s essential to ensure that the lid of your charging case remains open. This step is necessary to access the system button conveniently.
3Press the System Button
Located on the right side, positioned between the two cradles holding the Beats Studio Buds, you will find the System button. Once you’ve located it, press and hold this button for approximately 15 seconds to initiate the hard reset process.
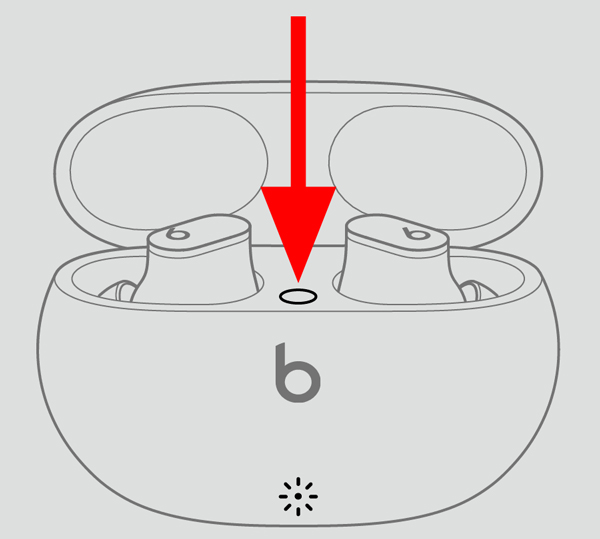
4Release the System Button After Following the Steps
After pressing the system button, observe the LED indicator light flashes in alternating white and red colors. At this point, you can safely release the button.
If, after holding the button for 15 seconds, the LED indicator light fails to flash in white and red, it could indicate a potential issue with your product.
However, if the LED indicator flashes on your buds, this signifies that a complete hard reset has been successfully executed, ensuring your Beats Studio Buds are now ready for optimal use.
Reasons to Reset Beats Studio Buds
Here are some reasons why you might need to reset your Beats Studio Buds:
- Connectivity Issues: If your earbuds are having trouble pairing or maintaining a stable connection to your device.
- Audio Problems: When you encounter sound quality issues, such as distorted audio or imbalanced sound.
- Device Switch: When you want to pair your Beats Studio Buds with a new device.
- Software Glitches: To resolve any software-related problems or unresponsiveness in the earbuds.
- Battery Concerns: If you experience rapid battery drain or charging problems.
- General Troubleshooting: As a general troubleshooting step to address various issues and restore the earbuds to their default settings.
How to Hard Reset Beats Studio Buds
Here’s a concise guide on how to hard reset your Beats Studio Buds:
- Begin by placing both earbuds inside the open charging case.
- Press and hold the System button on the case for 15 seconds or until the LED indicator alternates between red and white.
- Release the System button.
Once the LED indicator continues flashing white, your Beats Studio Buds are ready to be paired with your phone or other gadget.
Follow the video instructions on how to hard reset your Beats Studio Buds:
What to Do If My Beats Studio Buds Won’t Reset?
Here’s a list of steps to take when your Beats Studio Buds won’t reset:
- Check Charging Case: Ensure that both earbuds are properly seated in the charging case, and the case is open.
- Inspect System Button: Confirm that you’re pressing and holding the System button on the case for the recommended duration (usually around 15 seconds).
- LED Indicator: Watch for the LED indicator light to alternate between red and white during the reset process. If it doesn’t, there might be an issue.
- Retry: Attempt the reset process again, paying close attention to the instructions and timing.
- Charge: Make sure your earbuds and charging case have sufficient charge, as low battery levels can affect the reset process.
Caring for Your Beats Studio Buds: Best Practices
Maintaining your Beats Studio Buds for Peak Performance:
- Designed for Tough Conditions: Beats Studio Buds are built to withstand water and sweat, ensuring durability during workouts and adverse weather.
- Protect the Charging Case: Remember that the charging case is not water-resistant. If it gets wet while closed, promptly dry it. If wet while open, ensure complete dryness before charging.
- Not Waterproof: While water-resistant, Beats Studio Buds are not waterproof. Take care when exposed to substances like makeup, detergent, shampoo, hair dye, sand, pool water, or saltwater.
- Regular Cleaning: Frequent cleaning is vital to maintain hygiene and prevent skin irritation.
- Dry Before Charging: Never place wet or dirty earbuds into the charging case to ensure their longevity and performance.
Maintaining the Cleaning of Your Beats Studio Buds
Here’s how to clean your Beats Studio Buds effectively:
- Prepare a Cleaning Solution: Begin by preparing a gentle cleaning solution. Mix a small amount of mild soap or dish detergent with warm water.
- Remove Ear Tips and Sleeves: Carefully remove the ear tips and ear sleeves from your Beats Studio Buds. These can be washed separately.
- Dampen a Cloth or Cotton Swab: Dip a clean, lint-free cloth or a cotton swab into the cleaning solution. Ensure it’s not excessively wet, just slightly damp.
- Wipe the Earbuds: Gently wipe the exterior surfaces of the earbuds, including the outer shell and speaker grilles. Be cautious not to allow moisture to enter the speaker openings.
- Clean Ear Tips and Sleeves: If removable, wash the ear tips and sleeves in the cleaning solution. Rinse thoroughly and let them air dry.
- Dry Thoroughly: After cleaning, allow all components to air dry completely before reassembling and using your Beats Studio Buds.
- Avoid Harsh Chemicals: Do not use abrasive or harsh chemicals, alcohol, or solvents, as they can damage the earbuds.
By following these steps, you can ensure your Beats Studio Buds remain clean and in optimal condition.
Common Mistakes to Avoid During Beats Studio Buds Cleaning
Here’s what you should avoid when cleaning your Beats Studio Buds:
- Avoid Harsh Chemicals: Do not use abrasive cleaners, solvents, alcohol, or harsh chemicals, as they can damage the earbuds’ surfaces and components.
- Do Not Submerge: Avoid submerging the earbuds in water or any cleaning solution, as this can lead to internal damage.
- Minimize Moisture: Prevent excess moisture from entering the speaker openings while cleaning to avoid potential damage to the internal components.
- Don’t Rush Drying: Allow all components, including ear tips and sleeves, to air dry thoroughly before reassembling and using the earbuds.
- Skip Rough Materials: Do not use rough or abrasive materials, such as scrubbing brushes or scouring pads, as they can scratch and harm the earbuds’ surfaces.
By avoiding these actions during the cleaning process, you can help maintain the integrity and performance of your Beats Studio Buds.
FAQ
Conclusion
In conclusion, resetting your Beats Studio Buds is a straightforward process that can help resolve various issues and ensure they perform at their best. By following the simple steps outlined in this guide, you can easily troubleshoot problems and enjoy a seamless audio experience with your earbuds.


